Canoeing The Mighty Mississippi
Paddling Vicksburg to Baton Rouge
~ SMr Gear Review and Adventure Story by Nathan Beane ~
Last winter I was afforded the great fortune of embarking on an adventure down the mighty Mississippi River via a wooden, 30-foot cypress-built canoe. This voyager journey, spanning 209 river miles, departed from Vicksburg, MS and was set to arrive in Baton Rouge, LA after nine days of paddling with John Ruskey, as he is compiling River Gator, a paddler's guide detailing the river section from St. Louis to the mouth at the Gulf of Mexico. This was an adventure for the storybooks, and for a story of the journey check out the Winter 2015 issue of the ‘Sip (thesipmag.com River Gator story on page 52). Although I’m an avid outdoorsman and always looking for a new adventure, this long water journey was new for me, as was the sleep gear I took along. Packed into my dry bag were clothes, toiletries, and hammock-style camping gear supplied by Sierra Madre Research (SMr), a Vicksburg-based company. The challenge of taking this gear along with me was the uncertainty of where we would be setting up camp each night. Hammock-style camping requires trees to tie to and as we approached a new island or sandbar backchannel each day, the uncertainty was a bit nerve-racking.
Prior to departure I met with the owner of Sierra Madre Research and walked through all the components of the gear I would take along. I was equipped with the Pares Hammock, the Nubé Hammock Shelter (the shelter that encompasses you in your hammock and protects you from rain, wind, and insects), a Winter Barrier (an accessory to the Nubé adding additional wind blockage and warmth). In addition, a ground barrier accessory was provided, the Nubé Floor, which affords the opportunity to camp on the ground when trees simply aren’t around. After the run through, I took all the gear home and tried setting up everything within the woodlot around my home. The first setup went as planned, albeit much slower than what had been demonstrated to me only hours prior. Like everything, I just needed practice to perfect.
The next morning, all my gear was packed up and I headed to the river landing to load up and get our paddles in the water and head downstream.
The first nights campsite was in a tricky locale. As most of the team was tent camping, the weather had made it a necessity to seek out a secluded area behind a rock dike to protect the canoe and help shelter us from the constant, chilling winds. A high bluff just upriver provided a nice location to tuck the canoe and sheltered our campfire along the sandbar from the relentless winds. I made the decision to setup my Pares Hammock and Nubé hammock tent between two large eastern cottonwood trees atop the bluff. Although I was more exposed to the excessive winds, the spot provided a spectacular view of the river and I knew that sunrise the next morning would only improve the vista. Setting up at nightfall, I used a headlamp to aid visibility and began setting up the Nubé shelter, Pares hammock, and after staking out the shelter, added the winter barrier to the bottom portion of the shelter, to limit the airflow and cover up the mesh screening along the lower side of the Nubé. I estimate it took 20 minutes for me to setup everything from start to finish—a time that an experienced SMr junkie would find comical.
After setup, I loaded my dry bag inside the gear stash that suspends below the Pares hammock—what an awesome feature! It was so nice the first night to have my gear so nearby and underneath me as I forgot my reading light for my journaling, and only had to reach below to my bag to get it out. I loved knowing that had it rained, flooded, or even excessive dew had occurred, that all I had with me was safely inside the Nubé.
Once settled for bed, I was a bit nervous to sleep in a hammock all night, especially knowing the physical demand and muscular strain 9 days of paddling all day would entail. As I’m 6’3” in height, backaches from a bad night’s sleep on less-than-par surfaces are all too familiar. As I found my perfect layout that ensured comfort, which for me was lying with my head and upper body leaned to one side of the hammock, and my feet extending cattycorner to the opposite end of the hammock. This made me feel as though I was lying relatively flat and I fell asleep readily. The next morning, with the Winter Barrier in place, I woke up warm, comfortable, and stoked that the winds had died down substantially through the night. Only a slight amount of wind was able to enter the Nubé, and that was right at the top of the Winter Barrier. Although the air coming inside was chilly, I felt the addition of a little cold air was acceptable considering my desire for fresh air to be inside the shelter. As daybreak began, I jumped out of the shelter and assisted our team with gathering more firewood, stoking the fire, and preparing coffee and breakfast. Assuredly, I would have had at least a few sore spots on my side or back from tent camping on the hard ground, so the first nights hammock-style camping was a success.
Each night, as we ascended our canoe up onto a new riverbank sandbar, I would seek out two trees, spaced ideally 12-15 feet apart and that offered a great view of the morning sunrise. With each day and new experience with setting up the SMr gear, times to do so quickly diminished. One trick that helped with time was to leave the Winter Barrier attached to the Nubé shelter. Keeping these as one unit shaved minutes off of setup time. The second trick was the most beneficial to my comfort and undoubtedly made setup time more seamless and therefore faster. What I did was setup the tie lines and Pares hammock first. This allowed for the correct sway in the Pares as I preferred to sleep at and provided the most comfort. Once the Pares was just as I liked it (I’d even jump inside and decide if I wanted the hammock tighter or with more slack), I’d tie up the ridgeline of the Nubé hammock tent. Having the Pares already in place was convenient because I could adjust the ridgeline of the Nubé higher or lower to allow for maximum headspace inside the Nubé shelter without suspending too low and sitting on top of my gear once loaded up in the gear stash. Once the ridge lines were securely tied, I would simply unhook one end of the Pares carabiner and run inside the opening of the Nubé and secure the wind shield drawstring (Verso Sleeves) around the opening as I did, and repeat for the other side. This setup strategy, with each night became like clockwork and the challenge to have it setup perfect each time became my dusktime ritual.
One of the coolest features of the SMr Nubé shelter are the reflective strips sewn into each tie out line that is staked to keep the shelter in place and fully suspended once your inside. A few nights I had set up camp up a fair distance from the campfire and within or along dense stands of young willow trees. Finding my way back to the hammock would have been much more difficult had the reflective strips not been there. This made finding my resting area with a flashlight a breeze. The strips stand out like runway lights in complete darkness, and offered a cool view from afar.
One night, we camped on a sandbar island that didn’t afford the comfort of hammock camping as no trees were present. For that night I deployed the ground shelter (Nubé Floor) under the Nubé shelter which I was able to setup using hiking/trekking poles and crawled under for sleeping on the sand atop the ground barrier. Although this style of camping worked, the entire night I wished I was suspended between two trees and not sleeping on the hardpacked sand. Also, from sleeping so low to the ground, the warm air created within the shelter resulted in considerable dew formation, even on my face, which in December, wasn’t so pleasant. Needless to say, I made it a point to find trees for the rest of the journey.
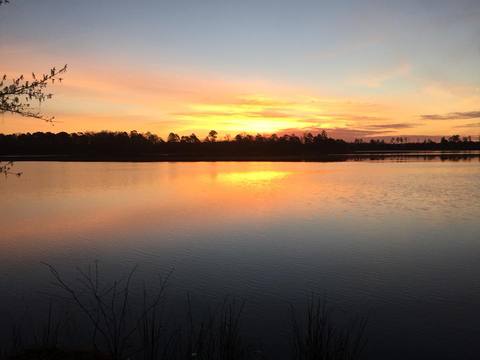
My favorite part of using the Sierra Madre Research gear for this trip was the joy of searching out the coolest spot possible to camp. Without the requirement for level, bare ground for tent camping, I was provided the luxury of setting up camp deep within the forest or high atop a sloughing bluff overlooking the Mississippi River. On the last morning of our journey, we were in our final stretch and hung around on the sandbar longer than other mornings. It was a wonderful experience simply removing the Nubé shelter and sitting quietly in the Pares hammock watching the larger-than-life sun rise up out of the horizon and glare across the tree line along the river’s edge.
As I loaded up the Pares and drew down the compression ties around each of the SMr gear bags, I was sad that the journey was almost over. If you’ve never tried hammock-style camping I recommend SMr gear. The materials are as solid as they come and over 9 days of setting up and taking down, not once did any seams unravel or anything even hinting at having a weakness. Give their gear a go, you won’t regret the investment, I assure you. I’ve made my first journey, now it’s your turn. Gear up and start yours!